How to Compress Videos Without Losing Quality
How to compress videos without losing quality using proven bitrate, codec, and resolution tricks that keep your footage sharp and shareable.
Every video creator eventually hits the same wall: the file is too big. Maybe your email won’t send it, your website is loading slower because of it, or your phone’s storage is screaming for mercy. The instinct is to just crank down the quality slider and hope for the best, but that usually ends with blurry, blocky footage that looks nothing like the original.
The good news is that how to compress videos without losing quality isn’t some secret reserved for professional editors. It comes down to understanding a handful of settings, mainly bitrate, codec, and resolution, and knowing which ones actually matter for the way you plan to use the video. Compress the right way and you can shrink a file by 50-80% and barely notice a difference on screen. Compress the wrong way and even a small reduction can look rough.
In this guide, we’ll walk through exactly what video compression is, why some methods preserve quality better than others, and seven practical techniques you can use today, whether you’re exporting from a professional editor or just need a quick online tool. We’ll also cover the best free software options, platform-specific settings for YouTube and Instagram, and the mistakes that quietly wreck video quality during compression. By the end, you’ll know exactly how to compress video without losing quality, no matter what device or software you’re working with.
What Is Video Compression and Why It Matters
Video compression is the process of reducing a video file’s size by removing or reorganizing data that isn’t essential to how the video looks or sounds. Every video is made up of an enormous amount of information: millions of pixels changing color and position, frame after frame, dozens of times per second. Compression finds patterns in that data and encodes it more efficiently, so you end up with a smaller file that still looks close to the original.
This matters for a few practical reasons:
- Faster uploads and downloads. Smaller files move through the internet quicker, which is a big deal if you’re uploading to a website, sending footage to a client, or posting on social media.
- Less storage strain. A single minute of uncompressed 4K footage can take up several gigabytes. Multiply that across a full project and you’ll fill a hard drive fast.
- Smoother playback. Devices with limited processing power, like older phones or budget laptops, struggle with massive, uncompressed files. Compressed video plays back more reliably.
- Lower bandwidth costs. If you’re hosting video yourself, smaller files mean lower server and bandwidth bills.
The goal of good compression is always the same: shrink the file as much as possible while keeping the visual and audio quality close enough to the original that most viewers won’t notice a difference. That balance is what separates a well-compressed video from one that looks like it was recorded through a screen door.
Lossy vs Lossless Compression: What’s the Difference
Before you compress anything, it helps to understand the two basic categories of compression, because they lead to very different results.
Lossy compression permanently discards some data to reduce file size. Once that data is gone, you can’t get it back. This sounds worse than it is, though, because most lossy compression is designed to remove information the human eye barely notices anyway, like subtle color gradients or fine detail in fast-moving scenes. Formats like MP4 and codecs like H.264 rely on lossy compression, and it’s the standard choice for streaming, social media, and web video because it delivers the best size-to-quality ratio.
Lossless compression keeps every bit of the original data intact. Nothing is thrown away, so you can compress and decompress the file repeatedly without any degradation. The tradeoff is that lossless files stay much larger than their lossy counterparts. This method is mostly used in situations where preserving every detail matters more than saving space, such as archival masters, medical imaging, or footage that will go through multiple rounds of editing.


For almost everyone reading this, lossy compression with the right settings is the way to go. It’s not about avoiding quality loss entirely; it’s about controlling where that loss happens so it stays invisible to the viewer.
Key Factors That Affect Video Quality When You Compress
Before jumping into specific methods, it’s worth understanding the handful of settings that actually control how a compressed video looks. Get these right and everything else falls into place.
Bitrate
Bitrate is the amount of data used to encode one second of video, usually measured in megabits per second (Mbps). Think of it as the “detail budget” for your footage. A higher bitrate allows more detail per frame, which means sharper images and smoother motion, but it also means a larger file. A bitrate set too low will produce blocky artifacts, especially in scenes with a lot of movement or fine texture, like grass, water, or crowds.
The trick to compressing video without losing quality is finding the lowest bitrate that still looks clean for your specific footage, rather than picking an arbitrary low number. A talking-head interview with a static background can handle a much lower bitrate than an action scene full of motion.
Resolution
Resolution refers to the pixel dimensions of your video, such as 1920×1080 (1080p) or 3840×2160 (4K). Higher resolution means more pixels, more detail, and a bigger file. Dropping resolution is one of the most effective ways to shrink a file size, but it’s also one of the most noticeable changes if the viewer is watching on a large screen.
A good rule of thumb: only reduce resolution if the video’s final destination doesn’t need the extra detail. A video destined for a phone screen or a small embedded player doesn’t need 4K resolution to look great.
Codec
The codec is the algorithm used to compress and decompress the video data. Different codecs achieve very different levels of efficiency. Newer codecs can deliver the same visual quality at a smaller file size than older ones, which is why codec choice is one of the biggest levers you can pull when trying to compress video without losing quality.
Frame Rate
Frame rate is how many individual images (frames) play per second. Standard video runs at 24, 30, or 60 frames per second. Higher frame rates create smoother motion but also add more data to encode. If your footage doesn’t need ultra-smooth motion, like a slideshow-style video or a static presentation recording, lowering the frame rate can trim file size with minimal visual impact.
7 Proven Ways to Compress Videos Without Losing Quality
Now that you understand the underlying factors, here are seven practical, tested methods for compressing footage while keeping it looking sharp.
1. Choose the Right Codec (H.264 vs H.265)
Codec choice has one of the biggest effects on the balance between file size and quality. The two most common options today are:
- H.264 (AVC): The most widely supported codec, compatible with nearly every device, browser, and social platform. It’s a safe, reliable default for most projects.
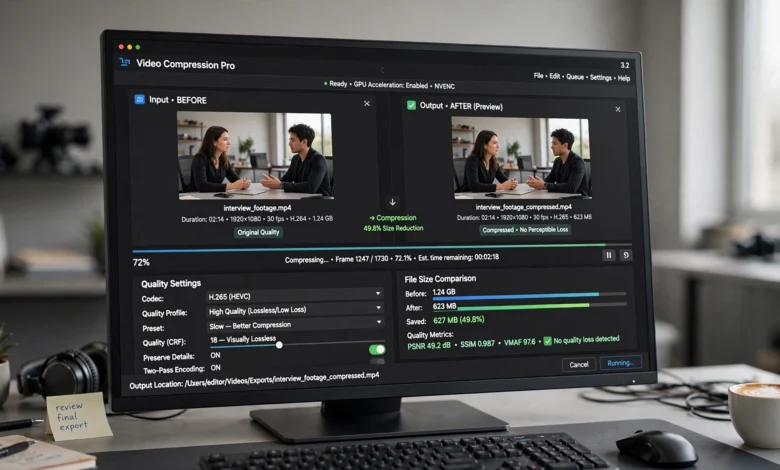
- H.265 (HEVC): A newer codec that can compress video to roughly half the file size of H.264 at the same visual quality. The catch is that it requires more processing power to encode and isn’t supported everywhere, particularly on older devices or some social platforms.
If your priority is maximum compatibility, stick with H.264. If your priority is squeezing out the smallest possible file size while keeping quality intact, and your target device or platform supports it, H.265 is the stronger choice. For reference, YouTube’s recommended upload encoding settings list H.264 as the standard codec for most uploads, which is a useful benchmark if you’re compressing footage for online publishing.
2. Use Two-Pass Encoding
Most compression software gives you the option of single-pass or two-pass encoding. Single-pass encoding analyzes and compresses the video in one go, which is faster but less precise. Two-pass encoding analyzes the entire video first to understand where detail and motion are concentrated, then compresses it a second time using that information to allocate bitrate more intelligently.
The result is a smaller file at a given quality level, or better quality at a given file size, compared to single-pass encoding. It takes longer to process, but for any video where quality genuinely matters, it’s worth the extra time.
3. Lower the Bitrate Strategically, Not Randomly
Instead of guessing at a bitrate number, calculate one based on your target file size and video length. A simple formula looks like this:
Bitrate (Mbps) = (Target file size in MB x 8) ÷ (Video length in seconds)
For example, if you want a 10-minute (600-second) video to land around 500MB, you’d aim for roughly (500 x 8) ÷ 600, which comes out to about 6.7 Mbps. From there, adjust slightly based on how much motion and detail the footage contains. Static or simple footage can drop lower without visible loss, while fast-motion or detail-heavy footage needs to stay closer to the higher end.
4. Trim Unnecessary Footage First
This one gets overlooked constantly, but it’s one of the easiest wins available. Before you even touch compression settings, cut out anything that doesn’t need to be there: dead air, long pauses, false starts, extra intro footage, or bloopers. Fewer frames means less data to encode, which means a smaller file with zero impact on the quality of the footage you keep.
- Review the full video and mark sections that add nothing to the final product.
- Cut long static shots down to what’s actually needed.
- Trim silence and dead space at the start and end of clips.
It’s a simple step, but trimming five minutes off a ten-minute video can cut file size dramatically before you even open your compression settings.
5. Resize Resolution Only When Needed
If your final video will only ever be viewed on a phone, embedded in a small website player, or shared where large screens aren’t in play, there’s no reason to keep it at 4K. Downscaling from 4K to 1080p, or from 1080p to 720p, can cut file size significantly with minimal visible quality loss on smaller screens.
The key word is “needed.” Don’t downscale resolution just because it’s an easy slider to move. If the video will be projected, viewed on a large monitor, or used for anything that might get re-edited later, keep the original resolution and rely on bitrate and codec adjustments instead.
6. Use Constant Rate Factor (CRF) Instead of Fixed Bitrate
If your compression tool supports it, Constant Rate Factor (CRF) encoding is often a better approach than setting a fixed bitrate. Instead of forcing every second of video to use the same amount of data, CRF adjusts the bitrate dynamically based on scene complexity, using more data for detailed or fast-moving scenes and less for simple, static ones.
This produces a more consistent visual quality throughout the video and typically results in a smaller overall file size compared to a flat bitrate target. Most modern encoders, including free tools like HandBrake, support CRF encoding, and it’s generally considered the more efficient way to compress video without losing quality.
7. Use Trusted Compression Software
The tool you use matters just as much as the settings. Free, well-regarded software like HandBrake gives you full control over codec, bitrate, resolution, and CRF settings, along with presets built for specific devices and platforms. Paid tools like Adobe Media Encoder or DaVinci Resolve offer similar control with tighter integration into professional editing workflows.
Avoid random, unfamiliar online converters, especially for anything sensitive or high-value. Beyond privacy concerns, many low-quality tools apply aggressive, uncontrolled compression that strips detail you can’t get back.
Best Free Tools to Compress Video Without Losing Quality
If you don’t want to install desktop software, there are solid browser-based options too. Here’s a quick breakdown of what to look for and a few reliable categories of tools:
- Desktop encoders (HandBrake, Shutter Encoder): Best for full control over codec, CRF, and bitrate. Free, open-source, and widely trusted.
- Editing software export settings (DaVinci Resolve, Adobe Premiere): If you’re already editing in one of these, compress during export instead of adding an extra step afterward. This avoids compressing an already-compressed file twice, which degrades quality faster.
- Online video compressors: Convenient for quick, one-off jobs when you don’t need advanced control. Look for tools that let you adjust bitrate and resolution manually rather than ones that apply a single fixed “compress” button with no settings.
- Built-in OS tools (QuickTime on Mac): Useful for quick resolution downscaling in a pinch, though they offer less granular control than dedicated encoders.
Whichever tool you choose, prioritize ones that let you preview the output or compress a short test clip first. That way you can check quality before committing to compressing a full-length file.
Compressing Video for Specific Platforms
Different platforms have different sweet spots for resolution, bitrate, and codec. Compressing with the destination in mind avoids both oversized files and unnecessary quality loss.
YouTube
YouTube re-compresses every video you upload, so there’s no benefit to over-compressing beforehand. Upload at a bitrate close to YouTube’s own recommended settings and let their servers handle the rest. For 1080p footage, a bitrate around 8 Mbps using H.264 is a solid starting point.
Instagram and TikTok
These platforms favor shorter, vertical video and apply their own compression on upload as well. Keeping your source file at 1080p with H.264 and a moderate bitrate (around 5-8 Mbps) usually strikes the right balance, since anything higher gets compressed away anyway.
Email and File Sharing
For email attachments or quick file sharing, file size limits are usually the priority over pristine quality. Dropping resolution to 720p and using a bitrate calculated for your target file size, combined with H.264 for compatibility, is generally the fastest route to a shareable file.
Website Embeds
For video embedded directly on a website, file size affects page load speed and SEO performance. Compressing to a moderate bitrate at 1080p or 720p, depending on how large the video player is on the page, keeps load times fast without sacrificing noticeable quality.
Common Mistakes That Ruin Video Quality During Compression
Even with the right tools, a few common missteps can undo all your effort. Watch out for these:
- Compressing the same file repeatedly. Every time you re-encode a lossy file, you lose a little more quality. Always compress from the original, uncompressed source whenever possible, not from a version that’s already been compressed once.
- Using a bitrate that’s too low for the content. A number that works fine for a static presentation will look terrible on fast-motion sports or action footage. Match the bitrate to the actual content, not a generic default.
- Ignoring audio settings. Video compression tools often compress audio too, and pushing audio bitrate too low leads to muffled or tinny sound even when the video looks fine. Keeping audio around 128-192 kbps in AAC or MP3 format usually preserves clarity.
- Downscaling resolution unnecessarily. If the final viewing platform can handle the original resolution, don’t shrink it just to save space. You’ll lose detail you didn’t need to lose.
- Skipping a test export. Compressing an entire long video without previewing a short section first means you won’t catch quality issues until it’s too late, and often after you’ve already deleted the original file.
- Using unreliable conversion tools. Some free online converters apply hidden watermarks, strip metadata carelessly, or use outdated codecs that produce worse results than modern alternatives. Stick to tools with a solid reputation, like HandBrake or established editing software.
Frequently Asked Questions
Does compressing a video always reduce quality? Technically, lossy compression always removes some data. But when done correctly, using the right bitrate, codec, and resolution for the content, that loss is invisible to the naked eye. The goal isn’t zero data loss; it’s zero noticeable loss.
What’s the best codec for compressing video without losing quality? H.265 (HEVC) generally delivers the smallest file size for a given quality level, but H.264 remains the safer choice for compatibility across devices and platforms.
How much can I compress a video before quality drops noticeably? It depends heavily on the source footage and your chosen settings, but well-configured compression can often reduce file size by 50-80% before quality loss becomes noticeable to an average viewer.
Should I compress video before or after editing? Always finish editing first, then compress on export. Compressing footage before editing and then compressing it again on export doubles the quality loss for no benefit.
Is it better to lower resolution or bitrate first? Start with bitrate. Resolution changes are more visually obvious, while a well-tuned bitrate can shrink file size substantially while keeping the original resolution intact.
Conclusion
Learning how to compress videos without losing quality really comes down to understanding a small set of controllable factors: bitrate, resolution, codec, and frame rate, and adjusting each one based on what your footage actually needs rather than defaulting to a random low setting. Start by trimming unnecessary footage, choose a codec suited to your compatibility needs, calculate a bitrate based on your target file size, and use tools like two-pass encoding or CRF for a more precise result.
Whether you’re exporting from professional editing software or using a free tool like HandBrake, the same principle holds true across every method: compress with intention, not by guesswork, and your videos will stay sharp, fast to share, and easy to store.