How to Automate Tasks with Zapier
How to Automate Tasks with Zapier: a practical, step-by-step guide to building your first Zap and cutting hours of manual work.
Most people don’t set out to become automation experts. They just get tired of doing the same boring thing over and over: moving a new lead from a form into a spreadsheet, copying an email attachment into Google Drive, or manually posting the same update to three social platforms. That repetition adds up fast, and it’s exactly the kind of work that software should be handling for you.
This is where Zapier automation comes in. Zapier connects thousands of apps you already use, like Gmail, Slack, Google Sheets, and your CRM, so that when something happens in one, something else happens automatically in another. You don’t need a developer, a budget for custom integrations, or hours of free time. You need about fifteen minutes and a clear idea of what you want to stop doing by hand.
In this guide, I’ll walk through exactly how to automate tasks with Zapier, starting from the basic vocabulary (Zap, trigger, action) all the way through building, testing, and troubleshooting your first real workflow. Along the way, I’ll cover pricing, common use cases, and the mistakes that trip up most beginners. By the end, you’ll have a working automation and a clear plan for what to automate next.
What Is Zapier and How Does It Work?
Zapier is a no-code automation platform that links different web apps together so they can talk to each other without any manual effort from you. Instead of logging into five tools every day to move information between them, you set up a connection once, called a Zap, and Zapier handles the rest in the background.
At its core, the logic is simple: “if this happens, then do that.” Something occurs in one app, and that event automatically causes an action in a different app.
The Building Blocks of a Zap
Before you build anything, it helps to know the four terms you’ll see constantly inside the Zapier dashboard:
- Trigger – The event that starts the Zap. This could be a new email in Gmail, a new row in a Google Sheet, or a new form submission.
- Action – What happens as a result of the trigger. This might be creating a task in Asana, sending a Slack message, or adding a contact to your CRM.
- Zap – The complete automated workflow made up of one trigger and one or more actions.
- Filter – An optional condition that only lets the Zap continue if certain criteria are met, so you’re not automating things you don’t actually want automated.
Once you understand these four pieces, you can basically read any Zap someone else built and understand what it’s doing.
Why Businesses and Individuals Automate Tasks with Zapier
People turn to task automation for a few very practical reasons, and it’s worth being honest about what it actually solves.
- Time savings – Manual data entry and app-switching eat up hours every week that could go toward actual work.
- Fewer mistakes – Humans mistype fields and forget steps. A well-built Zap does the same thing correctly every single time.
- Faster response times – A new lead can hit your CRM and trigger a follow-up email within seconds instead of hours.
- Scalability – As your business grows, your workflows don’t need more staff to keep up, just more Zaps.
- No developer required – Zapier’s point-and-click editor means non-technical teams can build real integrations on their own.
If your day involves moving information between two or more apps on a regular basis, there’s a decent chance a Zapier workflow can take that task off your plate entirely.


Step-by-Step: How to Automate Tasks with Zapier
Here’s the actual process, broken into steps you can follow along with right now.
Step 1: Create Your Zapier Account
Head to Zapier’s official website and sign up for a free account. The free plan is enough to build and run simple, single-step Zaps, which is exactly what you want while you’re learning. You can upgrade later once you know what more advanced workflows you actually need.
Step 2: Decide What You Want to Automate
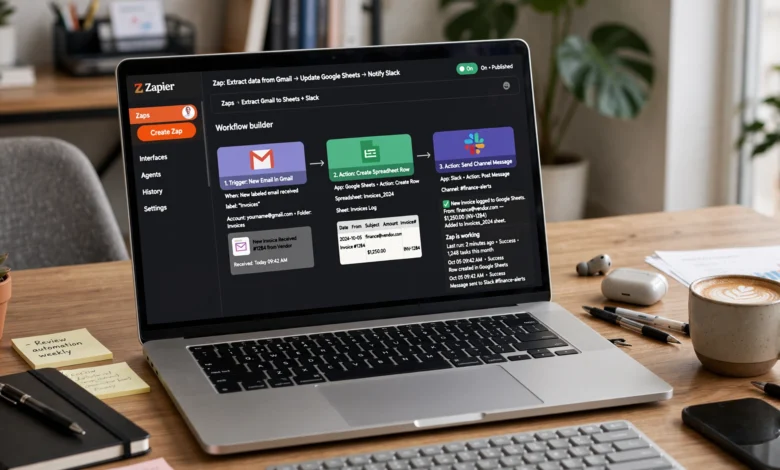
Before opening the Zap editor, write down the manual task in plain English. For example: “When someone fills out my contact form, I want their info added to Google Sheets and I want to get a Slack notification.” That one sentence already contains your trigger and your actions.
Good starting points for beginners include:
- Saving Gmail attachments to Google Drive automatically
- Adding new form submissions to a spreadsheet
- Posting new blog content to social media
- Sending a Slack alert when a new sale comes through
- Creating a calendar event from a new booking
Step 3: Choose Your Trigger App and Event
Click “Create Zap” in your dashboard. Search for the app you want to use as your trigger (Gmail, Typeform, Stripe, whatever fits) and select the specific event, such as “New Email” or “New Form Response.” Zapier will ask you to connect your account for that app, which usually just means logging in and granting permission.
Step 4: Test Your Trigger
Zapier will pull in a recent example of that event so you can confirm it’s grabbing the right data. This step matters more than people think. If the trigger data looks wrong here, everything downstream will be wrong too.
Step 5: Add Your Action Step
Now choose the app and event for what should happen next. If your trigger was “new form submission,” your action might be “create row in Google Sheets” or “send channel message in Slack.” Map the specific fields (name, email, message) from your trigger into the corresponding fields in your action. This is the part that actually connects the two apps.
Step 6: Add Filters or Multiple Steps (Optional)
If you only want the Zap to run under certain conditions, like only for leads from a specific country, add a Filter step between the trigger and action. You can also chain multiple actions together. A common example: new email attachment → save to Google Drive → send Slack notification with the file link. Most working professionals I’ve seen build Zaps end up chaining three to five actions once they get comfortable, not just one.
Step 7: Test and Turn It On
Run a full test to make sure data flows correctly from the trigger through every action. Check the field mapping one more time, then flip the Zap from “Draft” to “On.” From this point forward, it runs automatically in the background, no further input needed from you.
Advanced Ways to Automate Tasks with Zapier
Once the basics feel comfortable, there’s a lot more room to build smarter, more efficient workflows.
Multi-Step Zaps
Instead of one trigger and one action, you can add several actions in sequence, and even branch into different Paths depending on conditions. For instance, a new lead could go down one path if they’re a high-value prospect and a different path if they’re not.
AI-Powered Automations
Zapier has leaned heavily into AI automation in recent years. You can now describe an automation in plain language and have Zapier’s AI agents build it for you, or use AI steps inside a Zap to summarize text, draft email replies, or categorize incoming data before it hits your next app. This is especially useful for tasks like reading customer feedback and generating a personalized response automatically.
Webhooks for Unsupported Apps
If an app isn’t officially supported in Zapier’s app directory, webhooks often fill the gap. They let you send and receive data from virtually any tool that supports them, which opens up automation possibilities well beyond Zapier’s built-in app list.
Zapier Tables and Transfer
Two features worth knowing about as you grow:
- Tables – A simple built-in database inside Zapier for storing structured data without needing a separate app.
- Transfer – A tool for moving large volumes of existing data between apps in bulk, rather than one record at a time.
Zapier Pricing: What It Actually Costs
Zapier runs on a task-based pricing model rather than charging per user, which matters if you have a small team. Each time an action step runs, it counts as one task.
- Free plan – Good for simple, single-step Zaps and light personal use.
- Paid plans – Start around $19.99/month and unlock multi-step Zaps, filters, and higher task limits as you scale.
The right plan really depends on volume. If you’re automating a handful of personal workflows, free is often enough. If you’re running a business with dozens of active Zaps, you’ll want to budget for a paid tier that matches your monthly task count.
Common Zapier Automation Ideas Worth Stealing
If you’re not sure where to start, these are some of the most practical, high-value automations people build:
- Lead management – New form submission → add to CRM → send email notification.
- Social media – New blog post → auto-generate and schedule social posts.
- Email organization – New attachment → save to Google Drive → notify team in Slack.
- Project management – New task created → add to calendar → notify assigned team member.
- Expense tracking – Forward a receipt by email → extract data with AI → log it in a spreadsheet.
- Customer support – New support ticket → categorize by urgency → alert the right team.
- Reporting – Weekly data pull → update spreadsheet → send summary report automatically.
Start with just one of these. Trying to automate everything in your first week is how most people end up overwhelmed and quit.
Troubleshooting: When Your Zap Isn’t Working
Even simple workflow automation runs into hiccups sometimes. Here’s what to check first.
Zap Not Triggering
- Confirm the trigger event happened after the Zap was created (Zapier generally won’t retroactively catch older events).
- Double-check that the connected app account is still authenticated and hasn’t lost permission.
- Make sure the Zap is actually turned on, not sitting in draft mode.
Action Step Failing
- Review the specific error message Zapier provides. It usually points directly to the problem.
- Recheck your field mapping. A common mistake is mapping the wrong data field into an action.
- Confirm all required fields for that action are filled in with valid data.
General Best Practices
- Start with a single trigger and single action. Add complexity only once the basics work reliably.
- Always use Zapier’s built-in test mode before turning a Zap on live.
- Check your task history periodically so you catch silent failures before they become a real problem.
Zapier vs. Other Automation Tools
Zapier isn’t the only option, and it’s worth knowing when it’s the right fit. It connects thousands of apps with a very approachable point-and-click interface, which makes it the strongest choice if your bottleneck is repetitive, relatively straightforward work like lead entry, follow-up emails, or invoice creation. If you’re building complex, branching logic across six or seven systems with heavy conditional logic, tools like Make or n8n sometimes offer more flexibility, though usually with a steeper learning curve. For most individuals and small-to-midsize teams just trying to automate tasks with Zapier for the first time, the simplicity is the whole point, not a limitation.
For a deeper technical comparison of automation platforms, resources like Zapier’s own app directory are a good place to check whether your specific tools are supported before you commit to a plan.
Tips for Getting the Most Out of Zapier
- Start small. One working Zap beats five half-finished ones.
- Name your Zaps clearly. “New Lead to CRM” is far more useful six months from now than “Zap 12.”
- Review task usage monthly. It’s easy to accidentally build Zaps that burn through your task limit faster than expected.
- Use templates. Zapier’s template library covers most common use cases and saves you from building from scratch.
- Document what each Zap does. If someone else on your team ever needs to edit it, a short note saves a lot of guesswork.
Frequently Asked Questions
Is Zapier hard to learn? Not really. If you can use a spreadsheet, you can build a basic Zap. The interface is built specifically for non-technical users.
Do I need to know how to code to automate tasks with Zapier? No. Zapier is a no-code platform. Coding knowledge helps for advanced webhook setups, but it’s not required for the vast majority of automations.
How many apps does Zapier support? Thousands, covering everything from email and CRMs to spreadsheets, social media, and project management tools.
Can Zapier handle complex, multi-step workflows? Yes, through multi-step Zaps, filters, and Paths for conditional logic, though very complex branching may eventually push you toward a more advanced tool.
Is there a free version of Zapier? Yes, and it’s genuinely usable for simple, single-step automations before you need to consider a paid plan.
Conclusion
Learning how to automate tasks with Zapier isn’t about becoming a technical expert. It’s about identifying the repetitive, manual work eating up your day and letting software handle it consistently and correctly instead. Start with one clear, annoying task, like moving form data into a spreadsheet or saving email attachments to Drive, and build a single Zap around it. Test it, turn it on, and let it run for a week.
Once you see how much time that one automation saves, you’ll naturally start spotting the next five tasks worth automating. Zapier rewards this kind of incremental approach far more than trying to automate your entire workflow on day one, so keep it simple, keep building, and let the time savings compound.